
I know it's been a long time since I last posted.
I have been without a stable internet connection for a time now, and life has also been keeping me rather busy, what with two jobs and all - around the time of my last update, I got an apprentice-type job at a local stained glass studio. Exciting! So that plus my other job, plus keeping up with torching and all the other things that crop up around here, well... it ends up in me not being a very good blogger.
I have been selling pendants! I should really put up some new photos, because the last detailed photos I posted of my pendants, I feel, are no longer an accurate representation of what they look like. I've sold just over twenty so far, and it never gets old. Every time someone buys one, I get such a feeling of satisfaction.
Soon I will be venturing into, more or less, uncharted territory - working hollow!
Thursday, February 17, 2011
Tuesday, October 12, 2010
Glow In The Dark
Perhaps I was inspired by the bright-colors-and-lights bike ride I went on last night when I decided that tonight I would finally experiment with the glow-in-the-dark glass powder I ordered. (It is not cheap, but how cool is glow in the dark glass?) I hope these puppies turn out! There was a cautionary note packed with the powder about lots of little air bubbles forming and causing thermal shock problems, and the end product potentially cracking, but I'm pretty confident that I used the stuff correctly.
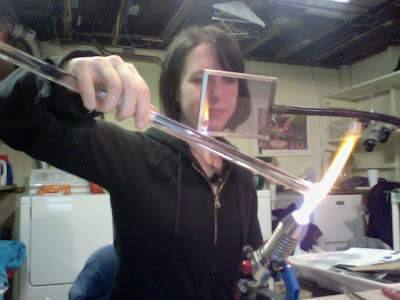
So here I am starting out making a pendant. (I actually have process photos for a change!) At this point I think I've flattened the end of the clear rod, put a colored glass dot design on the flattened surface, and begun imploding the color. (Imploding basically means melting the glass at an angle and allowing gravity to pull the clear glass over and around the colored glass, so that the colors end up inside of the clear glass.)
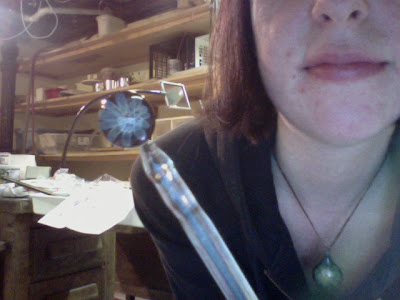
Here's pendant #1 in mid-implosion. I wasn't sure if the glow-in-the-dark powder would come out opaque or transparent, so for this first one I decided to put a colored dot on each of the glow dots so that the colored dot would ultimately end up inside the glow glass. Not sure how that will turn out, but I'll find out in the morning after the kiln has come down.
And for pendant #2 (this is before imploding) I made the central dot with glow glass, surrounded it with blue dots, surrounded those with glow dots, and made a final (somewhat sloppy) ring with the blue. (It will look blue when it has cooled.)

And here is that same pendant #2 after I've imploded it, put a backing color on, and puntied it onto another glass rod. (Sorry about the poor quality photos.) The final step is to put a loop on top to make it into a pendant.
So here I am starting out making a pendant. (I actually have process photos for a change!) At this point I think I've flattened the end of the clear rod, put a colored glass dot design on the flattened surface, and begun imploding the color. (Imploding basically means melting the glass at an angle and allowing gravity to pull the clear glass over and around the colored glass, so that the colors end up inside of the clear glass.)

Here's pendant #1 in mid-implosion. I wasn't sure if the glow-in-the-dark powder would come out opaque or transparent, so for this first one I decided to put a colored dot on each of the glow dots so that the colored dot would ultimately end up inside the glow glass. Not sure how that will turn out, but I'll find out in the morning after the kiln has come down.

And for pendant #2 (this is before imploding) I made the central dot with glow glass, surrounded it with blue dots, surrounded those with glow dots, and made a final (somewhat sloppy) ring with the blue. (It will look blue when it has cooled.)

And here is that same pendant #2 after I've imploded it, put a backing color on, and puntied it onto another glass rod. (Sorry about the poor quality photos.) The final step is to put a loop on top to make it into a pendant.

Saturday, September 11, 2010
First Friday at Collier Craft Studio
So the photos from the gallery opening back on August 1st didn't turn out so well, but that's okay because improvements were made to the display and content of my work between August 1st and First Friday, September 3rd, 2010. So here is some documentation! Thanks to my wonderful cousin for volunteering her camera to my cause! (Updating this would be a lot easier if I actually had a functioning digital camera.)
 Collier Craft gallery is set up in a fairly unconventional manner, with less dramatic, museum-style elements and more of a craft show feel, with work leaned, layered, and densely arranged. It makes for a pretty compelling atmosphere, one in which you want to really look everything over in case you missed something glorious.

Everything is for sale!


 There was even live music!
 I give Collier Craft gold stars. While the fluorescent lighting leaves something to be desired, there's not much to be done about it since the space is used by a bank during tax season.
 Here's me and Lindsey, the lovely Miss In Charge, Visionary and Gallery Organizer Extraordinaire. (She's great!)
 Collier Craft gallery is set up in a fairly unconventional manner, with less dramatic, museum-style elements and more of a craft show feel, with work leaned, layered, and densely arranged. It makes for a pretty compelling atmosphere, one in which you want to really look everything over in case you missed something glorious.
Everything is for sale!


 There was even live music!
 I give Collier Craft gold stars. While the fluorescent lighting leaves something to be desired, there's not much to be done about it since the space is used by a bank during tax season.
 Here's me and Lindsey, the lovely Miss In Charge, Visionary and Gallery Organizer Extraordinaire. (She's great!)
Monday, August 30, 2010
Implosion
 I finally have some pendants that are ready to be displayed for sale! I got a hold of some cords to string each of the pendants on, some little boxes to house them, designed a little insert for them, which I scanned and touched up and saved to a thumb drive, and finally went to Kinkos today and had them printed on fancy card stock. I cut them all out, made slots for the cord, et voila!
 Also currently happening is an exhibition at a new studio called Collier Craft in East Rochester. I have four-ish pieces on display as well as a number of pairs of earrings. The photos of the opening didn't actually turn out so well, but one of these days I'll give you a visual of the exhibition. It's pretty cool! My first show since my senior show at Alfred. It will be open until January 1st if anyone would like to check it out.
Tuesday, August 3, 2010
Pendants
 Here are some of the fruits of my labor! They do look better in person, when you can really see all the colors and layers and depth to them. Perhaps I'll photograph the actual process of making them sometime.
Subscribe to:
Posts (Atom)
